How to Add Open Shelving to Kitchen & Kitchen Update
Thinking of adding open shelving to your kitchen? See how easy and affordable it is to add open kitchen shelving to your space!

It has been a while since I have updated you on our Fixer Upper Progress and that isn’t because we aren’t making any. It is mostly because we haven’t had any big projects lately. Just a ton of small ones that have made a big impact. My goal is to replace the cabinets and countertops within the next year, but in the meantime, I want a kitchen that I can use. So, I decided to add some open shelving and remove an upper cabinet to make the kitchen a prettier and more functional place to be in.
Why I chose Open Shelving

For a long time, I was totally against open shelving. I like to be able to hide my messes behind closed doors, if you know what I mean. I have such a collection and mismatch of cups, mugs, and stuff in my kitchen cabinets that I didn’t want on display.
Then the more that I thought about it, like really thought, I realized that mess of “stuff” doesn’t make me happy. Having a set of glasses, and a set of mugs that match on a pretty shelf is so much nicer and less stressful. I open my cabinet and Marie Kondo-ed the heck out of it. I got rid of all the things that we didn’t need and ordered a new matching set of glasses for my new shelving.
So while I understand that open shelving isn’t’ for everyone. The stage of life we are in with teenagers that can be careful with glasses and mugs, I have no problem putting them on an open shelf.
Prepping the area
Obviously, the first thing that needed to happen was removing the old wall cabinet. Have I mentioned that I HATE the cabinets in this house? The last time I updated you on the kitchen I had painted them, and that helped, but they still need to go. It makes me so happy to haul them out of here, even if it is one cabinet at a time. PS: You can see what the kitchen looked like when we moved in (HERE) it is such a change!

After I removed the cabinet it was very clear that the wall had never been painted. ~blech~ I had two choices.
Paint over it or wallpaper.
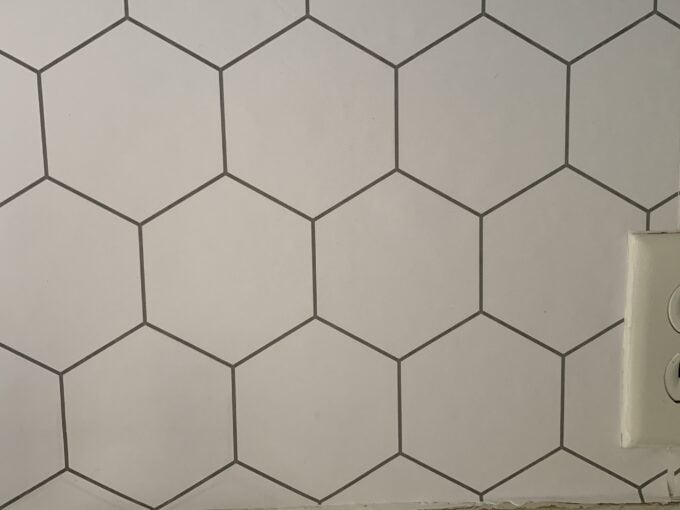
Now, most people would just paint over it, but I wanted something more. I would love to have a tile backsplash, but that will come with the cabinet and countertop update. In the meantime, I ordered this removable wallpaper that mimics a tile backsplash. Not only is it easy to put up and take down but it is super affordable too! This covered the hideous wall and gave me a perfect backdrop for my shelving.
How to Add Open Shelving to a Kitchen
The first step is to measure the available space and decide the size of your shelves. I had enough room for a 38″ wide shelf to fit comfortably.
This was a project I had been thinking about and I had purchased my brackets from ETSY, They are forged steel and actually pretty affordable. I had them made to hold a 12″ deep shelf. You can also order brackets from Amazon that are of equal quality.
You want to have enough brackets to be supportive of your shelf. I knew my wall studs are every 16 inches and where they are placed on the wall, so I was ok with just 2 per shelf. Anything bigger and I would have wanted 3. You NEED to screw your brackets into studs. This is the only way they are going to be supportive enough to hold the wood shelf and all of your items.
If you can’t screw into a stud your local hardware store should sell heavy-duty toggle anchors. These are AWESOME, and some are rated for HUNDREDS of pounds. They are a great option if you just can’t screw into studs.
I went to Lowes and bought a 12 x 2 x 12 piece of lumber. Then, I had them cut it for me in store in the 38-inch lengths so I wouldn’t have to fuss with it. They will cut the wood for free in-store with no problem. They were able to cut 5 boards out of the one piece of lumber and it only cost me about $20! So I have 2 bonus shelves for another project (my hubby is thrilled, LOL).
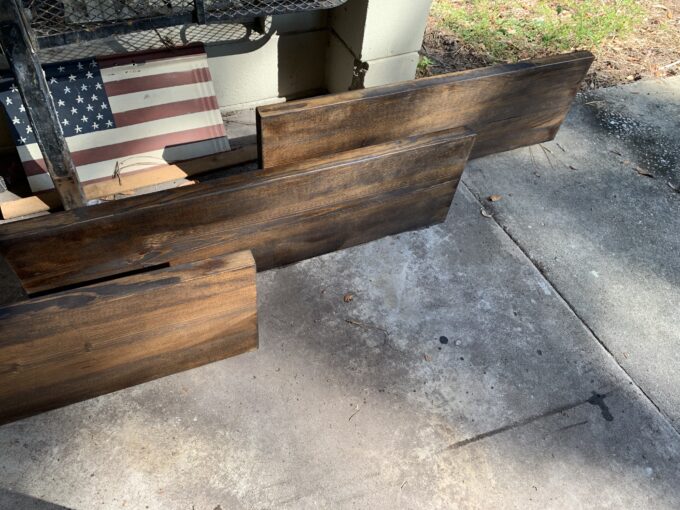
I brought the boards home and sanded them, then I used a dark walnut stain on each shelf. After staining I had to practice patience and let the stain cure for 24 hours. Finally, I sprayed them with a water-based polyurethane. They sell it in a spray can like spray paint, which was the best thing ever! I wanted to poly the shelves because they would be holding glasses that could get wet.
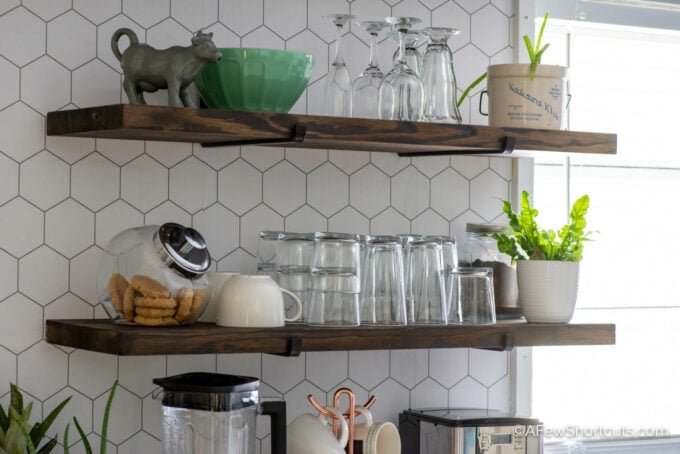
I screwed the brackets into the studs and used a level to hang the matching bracket into the adjacent stud. Once the brackets were in I laid the wooden shelf right in the brackets. Voila!
Height to Hang Shelves

How do you know how high to hang your shelves?
Standard cabinet height is a distance from counter to lower shelf of about 24 inches.
Then you want at least a 15-inch space between shelves.
What do you Put on open shelves?
This is all up to your personal preference. The location of my open shelves is where the cabinet that held my cups was. I loaded the lower shelf with glasses and mugs, The middle shelf with lesser-used glassware, and the top shelf is mostly knick-knacks. Each shelf has a plant to add a pop of color and some other items that I love because that is what it is all about, isn’t it? Loving your kitchen.
How much did it cost?
This is the big one? So what is it going to cost me to install open shelves?
- 12x2x12 Pine Board $22
- 6 Iron 12-inch wall shelf brackets (ETSY) $55
- Dark Walnut Stain $7
- Spray Polyurethane $8
Grand Total this project cost me $92
Other things I bought for this small update
- Adhesive Wall Paper – 4 rolls $28
- Wood Trim for Window $4
- New Kitchen Faucet (I LOVE IT!) $57
- Light Fixture for over the sink $29.99
About $119 on other upgrades


