How to Make Beeswax Food Wraps
Just a few affordable supplies and a couple steps and you can learn how to make beeswax food wraps for a sustainable way to store your food!

I was in Trader Joes the other day. That should be the beginning of every epic story. LOL Anyway, I found these Beeswax food wraps and bought a 3 pack for, maybe $10. I might be wrong on that, so don’t quote me. Once I got them home and really looked at them, I knew they would be easy to make, but I just had to nail down the process. I even took a peak at ETSY, but those suckers were expensive! Lucky for you, I was committed and found out exactly How to Make Beeswax Food Wraps. They are easier than you think, and a great gift idea!
What are Beeswax Food wraps
If you are wondering what the heck I am talking about, beeswax food wraps are pieces of fabric that have been treated with beeswax to make them waterproof. They are slightly sticky and a replacement for plastic wrap or even plastic bags in the kitchen.
Everything used to make them is non-toxic so you don’t have to worry about chemicals or anything strange coming in contact with your food.
What you Need to Make Beeswax Food Wraps

If you are ready to give this a try you will need to gather your supplies. You are going to start with 100% cotton fabric. Organic is great, but can be harder and more expensive to find. You can choose any pattern or style you want. I have found this works best with darker or bolder patterns. The wax and rosin can give off a little bit of yellowness during the process that you don’t notice on darker fabrics. The big thing is wash it and dry it before you start.
You will also need…
- Organic Beeswax (pellets are great)
- powdered pine rosin (adds tackiness)
- Jojoba Oil (for softness)
Then to make it all work you need…
Tips to Make Beeswax Food Wraps

There are a million recipes and tutorials on the internet for how to make these. I am sure some of them work great. The thing is, I tried about 5 and ended up still creating my own method from trial and error. You can see one of my errors above, the yellow stains are not a cute look on a food wrap.
Some methods call for brushing on the melted wax. I don’t know who these people are, but you waste more wax sucked up in the brush than you get on your fabric.
Another method said to sprinkle everything on the fabric and pop it in the oven. Again this doesn’t allow for anything to be evenly distributed and leads to a mess…trust me.
Finally, one method said to melt the beeswax, jojoba oil, and rosin together. I don’t know if you have ever tried to melt rosin, I hadn’t until this point, but it doesn’t melt. What I was left with was melted wax & oil with a chunk of rosin on my spoon. Not, exactly what I wanted.
Now that you pretty much know what NOT to do, here is what I did that gave me the best results.
How to Make Beeswax Food Wraps

Make sure your 100% cotton fabric has been washed and dried. Cut the fabric into the desired size square, rectangle, or circle you want to use.
I made several different size squares to fit different bowls, and then I made some rectangles to sew into little snack bags for later.

Now that your fabric is ready, in a glass bowl you want to melt the beeswax and jojoba oil together. For every 2 oz of beeswax use 1 tbsp of jojoba oil. I used a small kitchen scale and measured it out.
You can melt this in a few different ways
- with a double boiler
- in a microwave on 50% heat stirring in 30 second intervals until melted.
- on a mug warmer
The last one may sound a little crazy, but it works like a charm. I had an old mug warmer in the cabinet, pulled it out, set me glass bowl right on it and filled it with wax and jojoba oil. Since I used it in the past for candles I figured it should work on beeswax, and it does!

Have your sheet pan covered with parchment paper and ready to go. Take one piece of cotton and fold it in half and half again so it is a smaller rectangle. Carefully dip it into the hot wax mix allowing it to sit for a few seconds to soak up the wax. Slowly, lift it out using a wooden spoon, fork, or whatever you have on hand. Allow the extra wax to drip back into the bowl.

Carefully unfold your cloth and lay it flat on your parchment covered baking sheet. Now here is where the pine rosin comes in. I bought powdered rosin for this very reason. Gently sprinkle some as evenly as possible over the surface of your fabric. You don’t need a lot, but the ideas is to dust the top as evenly as possible. Before you ask if it is necessary, this is what adds the tackiness to your wrap. Without it, your wrap would not stick to your bowl as readily.

Preheat your oven to about 250 degrees F, and place the baking sheet with fabric inside. The heat will melt the wax mixture and pine rosin right into the fabric. Watch it carefully it only takes a few minutes.
When you remove it from the oven observe your wrap. If it needs more wax, give it another dip in your bowl continuing the process above, and place it back in the oven for 2 minutes until melted evenly.

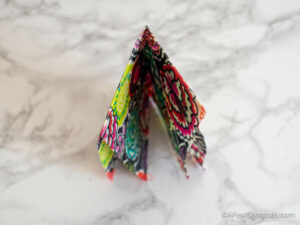
Once it is coated thoroughly, hang it on the back of a chair or on a hanger to cool. That should only take a few minutes. What you are left with is a wax covered cloth that has just enough tackiness to be used in place of plastic wrap over bowls and containers in your kitchen. Also, when you fold the wrap it is stiff enough to stand on its own. That is one test to know you have enough wax on your fabric.
How to Use Beeswax food wraps

These food wraps are perfect for sealing bowls with veggies or leftovers. Simply lay the wrap over the bowl and use your hands to shape it around the top. The heat from your hands activates the wax and rosin to adhere the wrap to your bowl.
You can use the same technique to fold your wrap over to make a small snack wrap or sandwich wrap. The heat from your hands will cause the wrap to stick to itself making an easy to use snack bag.
Turn them into Bags

These wraps are perfect to be turned into reusable sandwich or snack bags. I even have some bigger ones I used for cut up vegetables and love them. Just cut your fabric into a rectangle the size you will need for your bag. 13 inches by 7 inches should do for a sandwich bag. Make it as described above.
After the fabric has set and cooled. Fold your rectangle over into a bag shape and run it through your sewing machine placing a straight stitch on each side. Simply fold over the top to seal your bag and press with your hands. The heat will seal your bag.
Caring for Beeswax Food Wraps

Store these in a cool dry place in your kitchen. After use, rinse with cold water to wash and lay flat to dry. Don’t use hot water because it will melt the wax. If you feel like your wraps are loosing their tackiness you can retreat them with a little more wax and rosin in the oven the same way you made them.
DIY Beeswax Food Wraps

Equipment
Ingredients
- 2 oz Organic Beeswax pellets are great
- 1/2 tbsp powdered pine rosin adds tackiness
- 1 tbsp Jojoba Oil for softness
Instructions
- Make sure your 100% cotton fabric has been washed and dried. Cut the fabric into the desired size square, rectangle, or circle you want to use.
- Now that your fabric is ready, in a glass bowl you want to melt the beeswax and jojoba oil together. I used a small kitchen scale and measured it out.
- Melt your ingredients together in a glass bowl using either a double boiler, microwave on 50% heat in 30 second intervals stirring until melted, or on a mug warmer.
- Have your sheet pan covered with parchment paper and ready to go. Take one piece of cotton and fold it in half and half again so it is a smaller rectangle. Carefully dip it into the hot wax mix allowing it to sit for a few seconds to soak up the wax. Slowly, lift it out using a wooden spoon, fork, or whatever you have on hand. Allow the extra wax to drip back into the bowl.

- Carefully unfold your cloth and lay it flat on your parchment covered baking sheet. Gently sprinkle some pine rosin powder as evenly as possible over the surface of your fabric. You don't need a lot, but the ideas is to dust the top as evenly as possible.

- Preheat your oven to about 250 degrees F, and place the baking sheet with fabric inside. The heat will melt the wax mixture and pine rosin right into the fabric. Watch it carefully it only takes a few minutes.
- When you remove it from the oven observe your wrap. If it needs more wax, give it another dip in your bowl continuing the process above, and place it back in the oven for 2 minutes until melted evenly.
- Once it is coated thoroughly, hang it on the back of a chair or on a hanger to cool. That should only take a few minutes.
- What you are left with is a wax covered cloth that has just enough tackiness to be used in place of plastic wrap over bowls and containers in your kitchen. Also, when you fold the wrap it is stiff enough to stand on its own. That is one test to know you have enough wax on your fabric.


